Dashmirror
Originally posted on my personal blog, but I’ll try to write posts like this on Hack Ability in the future.
My name is Mel, I’m an electrical engineer with a built-in high pass filter (severe bilateral high-frequency sensorineural hearing loss since age 2), and this is my first Hack Ability post.
I also just got a car, and like most young people with cars, I like using my car to go out with friends.
Problem: The vibration of a car’s engine and the car rolling over the road happens to be right around the few frequencies of speech I can hear, which in the past has led to chronic episodes of – ah – educational detours, as friends yelled “GO RIGHT! RIGHT!” and I went “go straight? OK!” and missed our turn. Repeatedly. I’d usually lipread, but turning to lipread passengers is not a particularly great option when you’re going 60mph down a highway. In the dark. In the rain. In Boston.
Solution: Dashmirror!

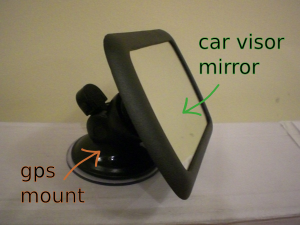
A photo of the dashmirror, with part labels; it's made from a car visor mirror glued to a GPS suction-cup mount.
It’s a simple design. My friend Mark and I made it during lunch one day when we were both visiting Chicago. The parts cost $36.62, but I’m pretty sure you could do it for cheaper.
- $4.39 for the mirror; we found one you’re supposed to clip to your car visor and just removed the clips. The important thing was finding a cheap light mirror of the right size.
- $3.99 for the smallest, cheapest tube of 5-minute epoxy we could find.
- $24.99 for the cheapest generic universal GPS mount in the store. It was still overpriced.
- And then 9.75% Illinois State Tax to make up the remainder.
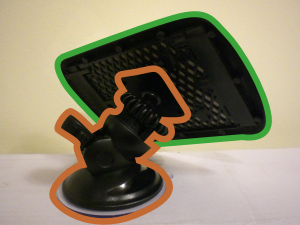
Assembly instructions: clear off back surface of mirror, choose broadest and flattest attachment for GPS mount, epoxy mirror to that attachment. Like I said, it’s a simple design. The tough part for us was finding the parts. We tried different types of GPS mounts and found a suction cup dampened vibration far better than a clip, so that’s the type I’d recommend; I haven’t yet tried the weighted kind you plonk onto your dashboard.

Dashmirror photo from the back, with the different part outlined in different colors to show how it was assembled. It's very simple.
This is actually the third dashmirror I’ve made, but the first I’ve been satisfied with. I cobbled together the first one when I was 17 in order to adorn the extra family car I drove to college (Melmobile v.1.0), and it was awful; there simply weren’t off-the-shelf parts available for mounting visual displays to the dashboard or windshield of your car. Now, thanks to the proliferation of GPS units, they’re everywhere.
Here’s a photo of the dashmirror in action, with my cousin (also named Mark) as the driver/model. Note that it works equally well from the passenger side – no more aching necks from constantly turning towards your driver! You do have to turn on the interior light when it’s nighttime, but you’d have to do that to lipread your driver or passenger anyway.

A photo of the dashmirror being used inside a car.
I use this every day, and love it. I’d like to come up with a more portable design so I can take it on the road with me (when I share rental cars with coworkers and such) – any ideas?
Trackbacks and Pingbacks
Comments are closed.